Categories
SEO SOCIAL MEDIA TIPS & TRICKS YOUTUBE YOUTUBE TUTORIALS

How to Add Captions to YouTube Videos

There are plenty of reasons why you might want to add captions to your YouTube videos beyond mere accessibility. Which is not to say, making your content more accessible to deaf and hard of hearing people is not a good enough reason alone.

We won’t try and tell you that adding captions to a video—especially a long video with a lot of words—is an easy task, but YouTube does make the process as frictionless as possible for you.

In this post we’ll go through the process with you, as well as laying out the reasons why captioning your videos is a good idea, and how you can make your life a little easier in the captioning process.

How to Add Captions to YouTube Videos

How to Add Captions to YouTube Videos

Captions can be added to your YouTube videos from within YouTube Studio.

  • Log in
  • Head over to the left-hand menu and click on “Subtitles”
  • Find the video you want to caption and give it a click.
  • Click “Add Language”
  • Next, click “Add” and begin scrubbing through your video, adding subtitles at the appropriate points.
  • Once you are done, simply click “Publish”

The subtitles editor features several shortcut keys to make your life a little bit easier, and you can find a full list of those on YouTube’s subtitles help page.

There are other options available, such as auto-syncing, which lets you add your transcription without any timecode information.

From there, YouTube uses speech recognition and your transcription to put all of the subtitles in the correct place. This is a very useful and time-saving option, but it does rely on speech recognition technology, which means it is only available for subtitles in the same language as the video.

For the same reason, it is not an ideal option for videos with poor audio quality, or where the words being said are not clear. YouTube also states that it is not recommended for videos that are over an hour long.

Another option available is to upload a closed caption file that already has the timecode information sorted. Of course, you will still have to create that closed caption file before you can upload it, but this option at least means you can use other applications to do that if YouTube’s built-in system is not to your liking. You can find details about what kind of closed caption files YouTube accepts through the subtitles help page linked above.

And, finally, YouTube has the option to caption your videos using speech recognition technology automatically. Automatic captioning has the obvious advantage of it requiring considerably less effort on your part; however, there is a tradeoff.

Speech recognition has made immense leaps and bounds in terms of accuracy over recent years, but it is not perfect, and the chances of it transcribing your video with 100% accuracy are minimal.

And, of course, the accuracy of this process will fall if the video’s audio quality is poor, or the spoken words are not particularly clear.

How to Add Captions to YouTube Videos 1

Bonus Method: Captioning Services

If you have a bit of money to spend on your YouTube channel, or if your channel is already at a stage where it is making money and you want to reinvest some of that in your channel.

You might consider a captioning service like Rev – I use them for all of my YouTube videos and can help boost audience retention and build on international audiences.

For a modest sum—typically around $1-2 per minute of video—you can have your videos captioned for you, getting all of the benefits of automatic captioning, while significantly reducing the inaccuracy rate you would expect from Google’s automatic option.

Captioning OTHER People’s Videos on YouTube

In some cases, you can also caption other people’s videos, which can be a great way to give a little back to a creator you like.

This is also an excellent opportunity to flex your bilingual muscles if you speak (or write) more than one language, or if your native language is different from that of the language used in the video.

The YouTuber in question has to allow subtitle contributions, so this is not an option on every video. For those videos where it is an option, simply head over to that video and click the menu button below the video (the three dots). In there you should see an option to “Add Translations”. Clicking that will take you to the same transcriptions editor we talked about above, with the difference that this will show any previously added or auto-generated transcriptions.

Up top you should see a “Switch Language” link which will allow you to select the language you want to add subtitles for, and, once you are ready, you can click edit and get transcribing!


Making Captioning Easier

Unfortunately, there is no way around the fact that captioning is something of a long and laborious process—especially for longer videos—but you can make your life a little easier with a bit of forward-thinking.

For example, many YouTubers plan their videos out in advance. And, if they don’t write an actual script, they at least tend to sketch out the beats of what they are going to say when the camera starts rolling.

If this is you, consider extending this process to a full script, and stick to that script when you record the video. In doing so, you will already have a transcription for your subtitles ready to go when you have uploaded your video. Remember; YouTube’s speech recognition may not be perfect, but it is incredibly close when given the correct words to use.

Writing a proper script may also help you tighten up your content, making the video more concise and digestible, while also reducing the amount of time you have to spend editing slip-ups and tangents out of your footage.

Of course, scripted videos are not for everyone. Some people are far more comfortable turning the camera on with little more than a vague shape of what needs to be said in their mind and letting the creative juices flow. We would not recommend forcing a script upon yourself if you are this kind of YouTuber.

But if you are already scripting—or partially scripting—your videos, you are most of the way there to captioning your content.

How to Add Captions to YouTube Videos 2

Why Should I Caption My YouTube Videos?

There is an ethical element to consider in the sense that, as a civilised society, it could be argued that we have a responsibility to help those who need a little extra help whenever possible.

Captioning your videos makes it possible for people who are deaf and hard of hearing—two groups of people who fall into that category of occasionally needing a little extra help—to consume your content.

However, if the ethical argument doesn’t do it for you, there are also some numbers to consider. For example, around 466 million people worldwide have disabling hearing problems. While it’s true that not all of those people will be on YouTube, it still represents a sizable portion of a potential audience that you could be reading. And this doesn’t count fringe cases, such as people who just find it easier to watch content with subtitles, or people who do not speak your language but can read it.

Another reason is search engine optimisation (SEO).

There is only so much information you can organically pack into your video descriptions, and formatting it in a way that is useful to your viewers doesn’t always lend itself to SEO.

However, the actual content of your video is as pure as it gets in terms of SEO, and research has shown that Google likely indexes YouTube subtitles, with captioned videos seeing a noticeable increase in views over videos without captions.

The final reason we will give you for captioning your videos is environmental factors. No, not the environment, we’re talking about the environment your potential viewer is in at the time they might want to watch your video.

If you’ve noticed all those videos that pop up on Facebook and Twitter that have captions burned in, you might have reached the natural conclusion that this trend implies. That is trend is more people watching videos in situations where they can’t have sound on. This could be on a busy commute when they have forgotten to bring headphones, or in a situation where they are not, strictly speaking, supposed to be checking their phone.

Viral video makers have cottoned on to this trend, and that is why they burn subtitles into those social media clips.

Putting captions on your videos allows people to consume your content in those situations where they can’t listen to it, which, for the right type of video, may represent a significant amount of views.

Am I Too Old to Start a YouTube Channel? 3

How Much of a Benefit is Video Captioning?

We teased you with talk of increasing your audience through video captioning, so it’s only natural to want to know what kind of increase we’re talking. After all, captioning can be hard work, as we’ve explained, so you may want to do a cost-benefit analysis on whether the additional work is worth your time.

Studies have shown that adequately captioned videos can see as much as a 13% boost in the first two weeks—with a 7% increase over the lifetime of video—over uncaptioned videos.

While we’re not talking about doubling your audience here, a potential increase of around 10% is nothing to be sneezed at. For a video that gets 100k views, that would mean an extra 10k views.

Of course, pure view count would be a limited way to consider the benefits of captioned videos. Those additional views also represent potential subscribers and long term viewers. Especially when you consider that people who need captions in order to enjoy content on YouTube have far fewer options available to them owed to the fact that so many YouTubers don’t caption their videos. In this respect, captioned videos are something of an underserved market.

Not quite a niche, as the interests of people who need closed captioning are just as diverse as those who don’t, but a market that will welcome additional content regardless.

How to Add Captions to YouTube Videos 3

Foreign Languages

Before putting the time and effort into translating—or paying someone else to translate—your content into other languages, take a moment to consider the usefulness of the video to the people who speak those other languages.

Generally speaking, you can assume that someone living in a particular country will at least have a basic grasp of the native language of that country.

Of course, there will always be exceptions, but you usually assume that content that is specific to a certain country doesn’t necessarily need translating to languages other than the primary language of that country.

As an example, a video about how to apply for a building permit in Texas, America, is unlikely to get many views from people in central Europe. That means it would not be the best use of your resources to have your video translated into German, as all of the countries where German is the primary language are located in central Europe.

This is not to say you should actively avoid translating your content, of course. If you have money or time to burn, it certainly won’t hurt your channel to have it translated into as many languages as possible.

But if you are having to weigh up the pros and cons of translating it to other languages, consider where those languages are spoken, and how likely your content is to be viewed in those regions.

That being said, the reverse can also be true.

As a counter-example, a video about how to obtain a building permit in Los Angeles would greatly benefit from being translated into Spanish, due to the large Mexican population there. In this case, the content is specific to a relatively small geographical region, but that region can be considered bilingual.

As with many things on YouTube, it is all a matter of doing your research and knowing your audience. You don’t need to become an expert in foreign languages to determine best when and when not to have your videos translated; a simple Google search should be enough.

Categories
HOW TO GET MORE VIEWS ON YOUTUBE LISTS TIPS & TRICKS YOUTUBE

10 Best Tools to Grow Your YouTube Channel

You can paint pictures using only your fingers, but it’s doubtful you’d be any good at it unless you are Iris Scott.

All accomplished artists use tools to help them express their creativity; one tool helps them draw perspective; another helps mix colour.

As a YouTube creator, if you’re only shooting a video quickly, then uploading it after basic editing, in your own way, you are painting with your fingers.

The top YouTubers use a range of tools to help create and promote their work.  Some help to make the videos more entertaining, while others allow their videos to rank well.

This article looks at ten products you could add to your YouTube video creation toolbox.  Five help the visual/production process, and the other five help you with SEO/ranking.

Let’s jump right in.

Visual / Production Tools For YouTube

These five tools help you to transform your videos from dull talk-to-the-camera sermons into more expert productions.

There are tools for graphics and editing, libraries of sound and b-roll footage, and tools for captioning your content.

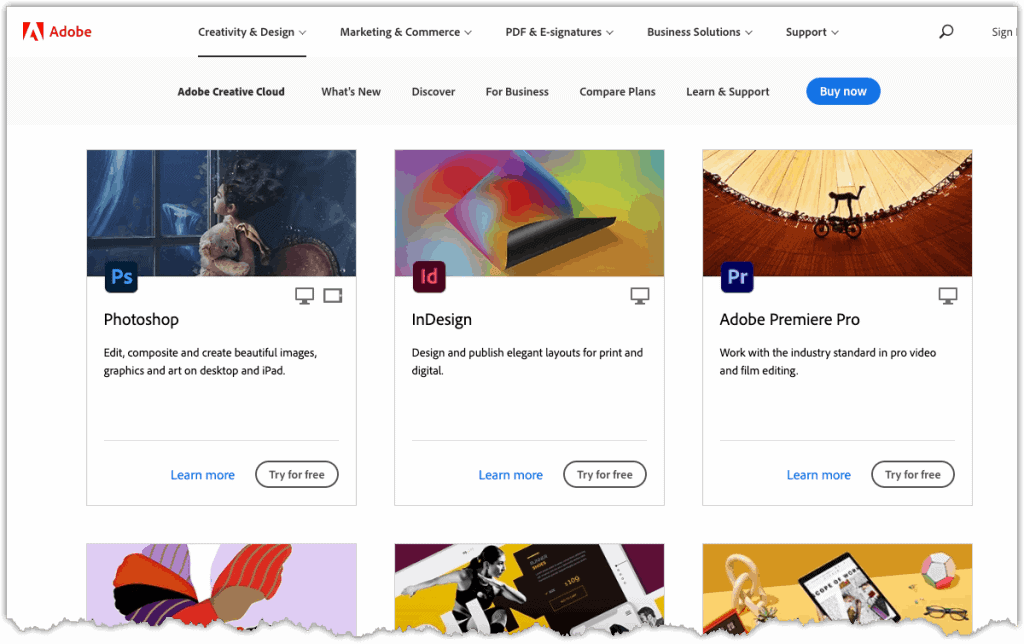
Adobe Creative Cloud – YouTube Video Production Tool

Occasionally you want a tool to edit photos, sometimes you need a tool to polish audio, and you always have to edit your content.

Adobe Creative Cloud is a suite of tools that help you to produce professional-quality content. For one monthly price, you get access to over 20 applications that are used by many of the top creators in the business.

10 Best Tools to Grow Your YouTube Channel

You could hunt around for individual alternatives from other providers.  Some you’ll be able to find free of charge, others you’ll be able to hack together using free trials, but you should want to use the best.  And the best thing about Adobe Creative Cloud is that all the tools in the suite work happily together.  So you’ll never have to hunt down file convertors, and you’ll be able to use tools that you hadn’t consider trying before.

For YouTubers, the centrepiece of Adobe Creative Cloud is Premier Pro, the industry-leading video editing software.  You’ll need a decent computer to run it on as it’s quite resource intensive.

While there is no free trial for the Creative Cloud collection of tools, you can trial some of the individual ones for 30 days. Adobe Creative Cloud works on both Windows and Mac.

Website: adobe.com
Price: $49.94 per month for access to all tools.

Storyblocks – Youtube B-Roll and Audio Library

Give your videos extra flair with B-roll footage and sound effects. These types of assets are available free of charge on some stock-footage websites, but the choice of clips is small, and many are overused.

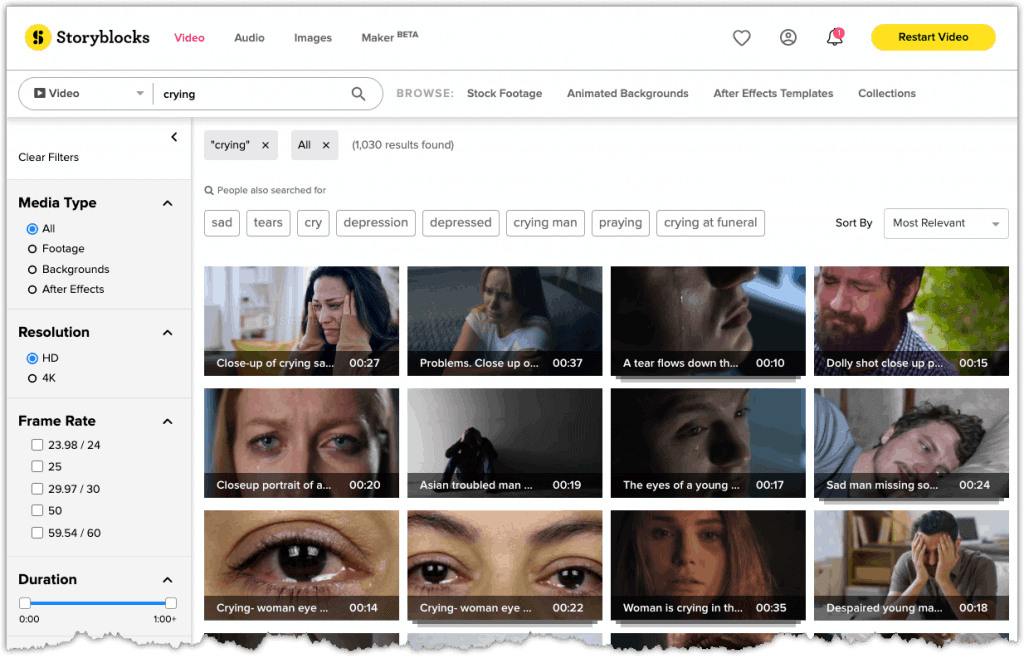
Storyblocks is a paid stock-footage website with 1.5 million videos, images, and sounds you can edit into your content.

All media is copyright-free and easy to find using categories and tags.

Want to cut to a person crying to emphasise a point? Storyblocks has a choice of over 1000 videos.

10 Best Tools to Grow Your YouTube Channel 1

Video is available in a variety of resolutions including 4K, and most clips are under 35 seconds long. The audio clips include sound effects, short tracks, and shorter loops which you can, well, loop to get the length you desire. If you need the sound of a hammer bashing on stone or an ambient backing track, you’ll find it on Storyblocks.

You can buy a lower-priced subscription to access only video or sounds, but these are quite restrictive.

Much better to buy a pass for unlimited access which is $65 per month. Plans are flexible, and you can sign up for only a month if you like.

You can also link your YouTube account to Storyblocks and let their automated software handle copyright infringement claims too.

Website: storyblocks.com
Price: Starting from $9 per month.

Placeit – YouTube Intro/Outro Tool, Channel Banners, Logos and End Screen Templates

Becoming successful on YouTube is very difficult to do without branding yourself. The immense volume of videos means you must build a recognisable image so that users can spot you in the search results and suggestions.

Of course, your branding needs to look good too. Crummy photoshop skills can make your videos stand out – but for all the wrong reasons. So use a service like Placeit to help you design and build a professional brand image.

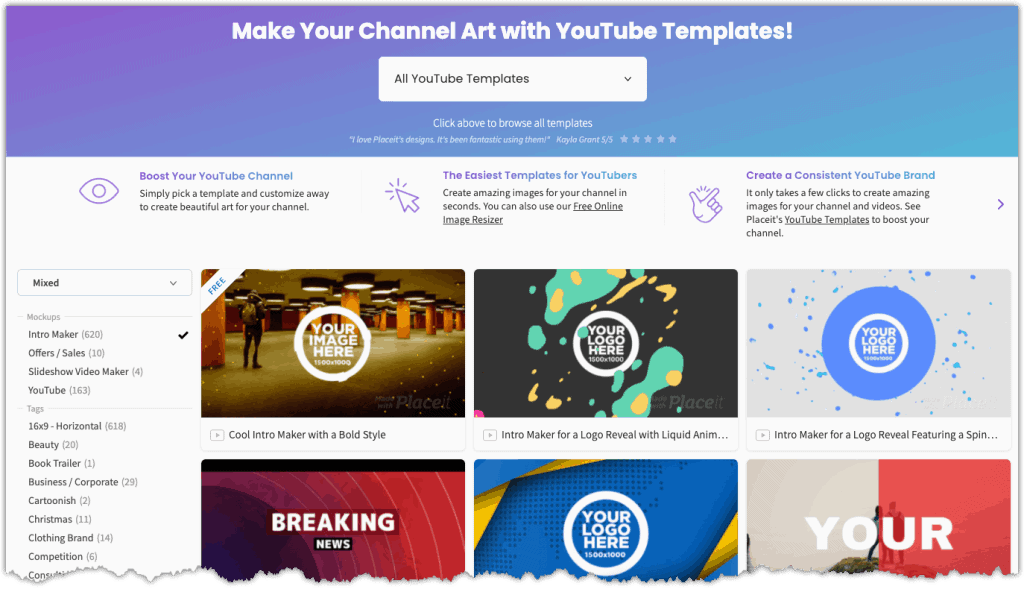
Placeit has dedicated tool to help you design and produce YouTube intros and outros and has hundreds of templates to pick from. You can also design custom logos and animate them too.

10 Best Tools to Grow Your YouTube Channel 2

It’s likely as a Youtuber that you will want to cross-promote content on social media as well.  Placeit has tools for creating Instagram stories and videos, and templates for Facebook covers.

Placeit is cloud-based, so you use all the tools via your browser. One price of $14.95 per month allows you to access all the functionality, and you can make a small saving paying upfront for an annual subscription.

Website: placeit.net
Price: From Free to $14.95

Rev – YouTube Caption Tool

Not all the people watching your content will view it in the same environment. Some will view your content in comfort sat on the sofa, where they can hear your voice clearly. Others will be on the move, on a bus or in a cafe, where listening can be difficult.

For some viewers, the location doesn’t matter at all: you exclude the hard of hearing when you don’t make your content accessible to all.

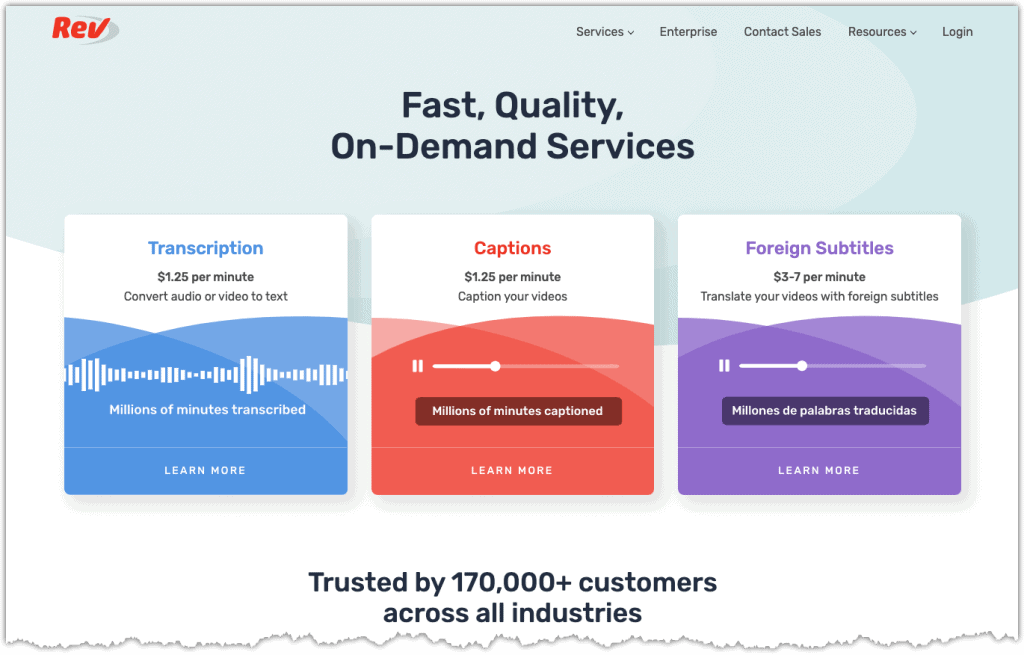
Rev is a service for adding captions and subtitles to your videos. Captions are a transcript of the words that you say, allowing the hard of hearing or those in a noisy environment to watch your content. Subtitles translate your content from your spoken language to another, opening your channel to a broader audience.

10 Best Tools to Grow Your YouTube Channel 3

Rev doesn’t charge a fixed fee for its service; you instead pay based on the length of your video. Prices start at $1.25 per minute, so you always know exactly how much it will cost you upfront.

Website: rev.com
Price: From $1.25 per minute.

Lickd – YouTube Premium Music Library

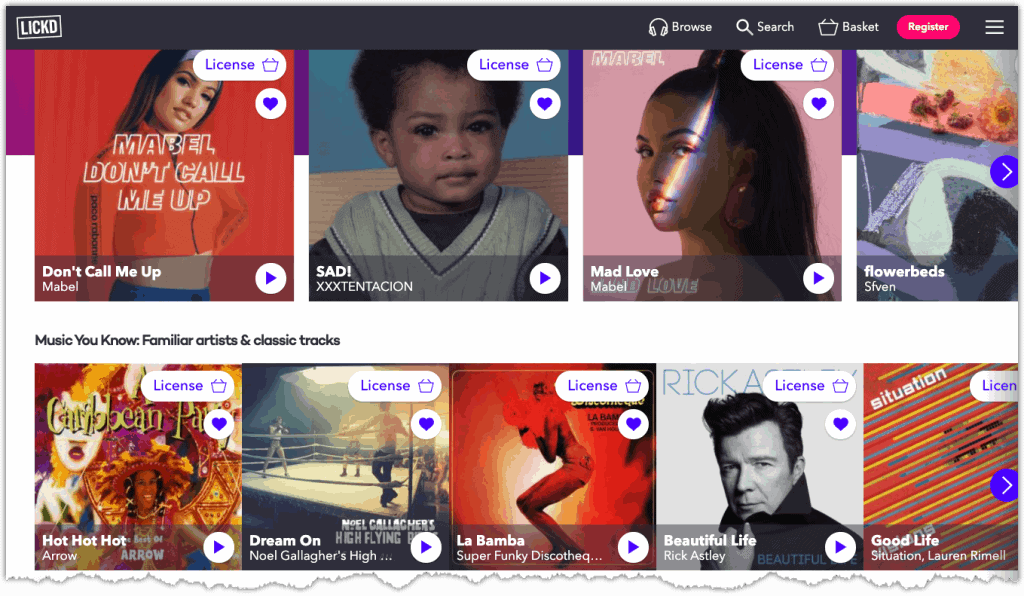
If you want to use music by real artists in your videos, but worry about copyright issues, then you should try out the music licensing service from Lickd.

Designed expressly for YouTube content creators, Lickd has thousands of real songs to choose from by genuine artists.

10 Best Tools to Grow Your YouTube Channel 4

You have to license each track individually, and Lickd set the cost dependent on your YouTube audience size. If you have under 50 thousand views on average for your videos, then prices start at $8 per track.

You’re not allowed to remix or change the music in any way, though you can edit for length. And while there aren’t too many well-established artists on the site yet, it’s early days. The more creators that use the service, the more artists Lickd are likely to attract.

Website: lickd.co
Price: From $8 per track.

SEO / Ranking YouTube Tools

You might create the best content around, but if you don’t choose the right keywords, or make the most of your metadata, then your channel may as well be invisible.

The following five tools help give you the best chance of your content being seen.

Google Trends

Google Trends gauges the popularity of any topic over time. It’s a way to discover which subjects are hot or not.

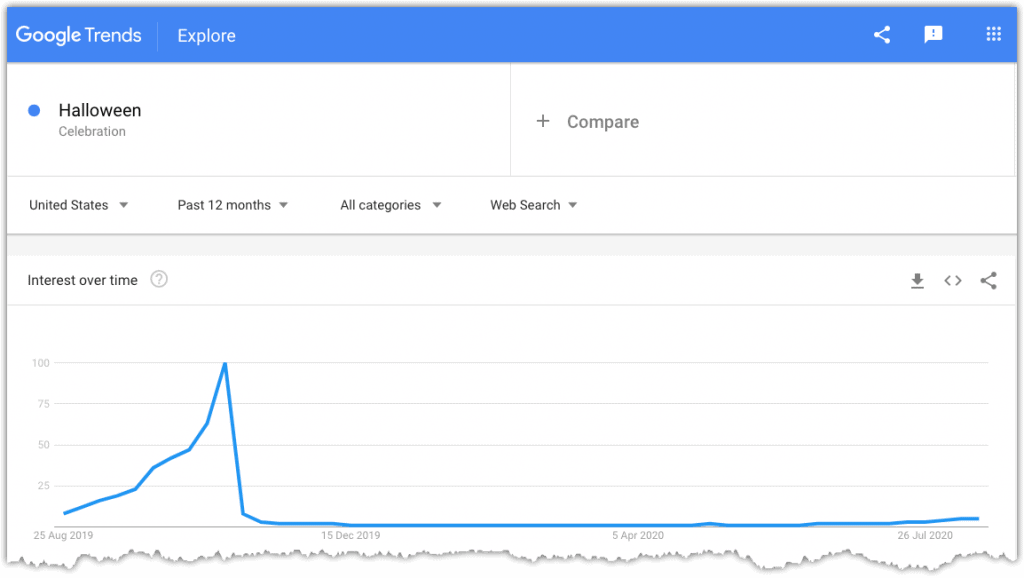
Google Trends can also help you plan the release of content for annual events.  For example, if you want to know the best time to upload Halloween-themed content, the chart below shows you that interest starts to climb in mid-September. Maybe a bit earlier than you might have thought?

10 Best Tools to Grow Your YouTube Channel 5

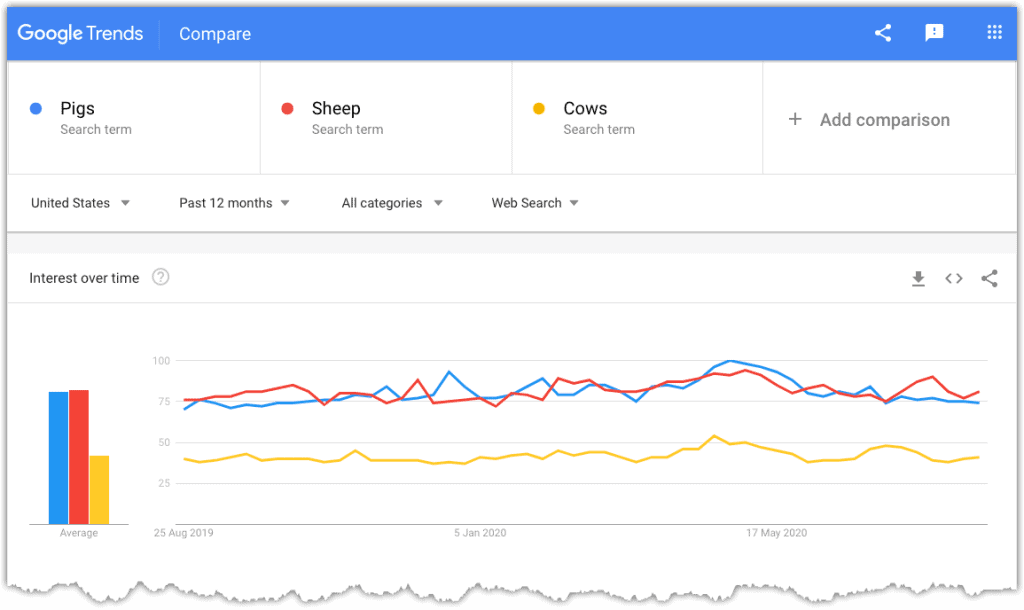
You can also use Google Trends to compare subjects, which can help you to narrow your focus when brainstorming ideas.

10 Best Tools to Grow Your YouTube Channel 6

Google Trends is free to use and has lists of daily trends and real-time search trends, so you can see what’s creating a buzz online today. You also can view trend data by country, so you can find out what’s popular in your corner of the globe.

Website: trends.google.com
Price: Free!

VidIQ

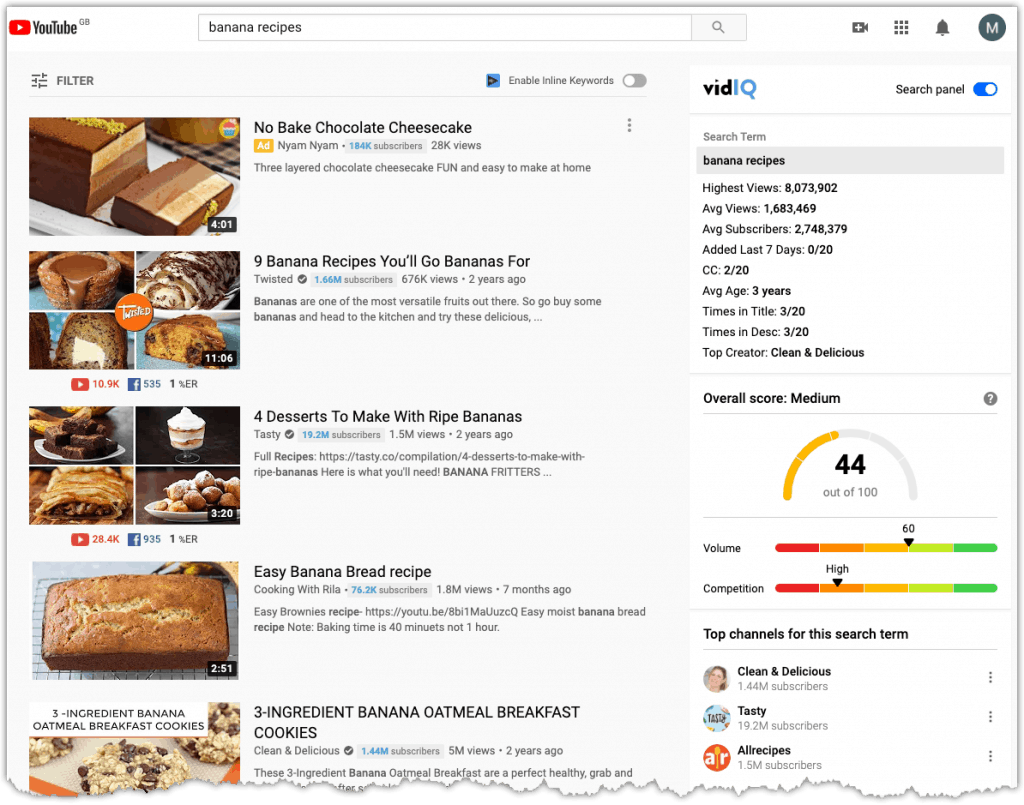
VidIQ is a tool that aims to help you grow your channel in two broad ways.

First, vidIQ helps to maximise organic reach by helping you select the best tags, and choose the right keywords for your title and description. VidIQ works as a chrome plugin that displays extra data directly on the YouTube website.

10 Best Tools to Grow Your YouTube Channel 8

Once your videos have gone live, vidIQ keeps you on track by letting you know which of your videos performs well.  The software also audits your content and can highlight issues, like which videos aren’t part of a playlist, for example.

There is a free option for the software, though this is restricted in functionality. To make the best use of the tool, you need to buy a subscription. The ‘Boost’ level is the best option as it allows you access to vidIQ’s keyword engine and permits you to track 20 competitors.

VidIQ is popular with many large and successful channels.

10 Best Tools to Grow Your YouTube Channel 9

Website: vidiq.com
Price: From free, though you need a subscription to get the most from the tool. Starting at $7.50 per month.

TubeBuddy

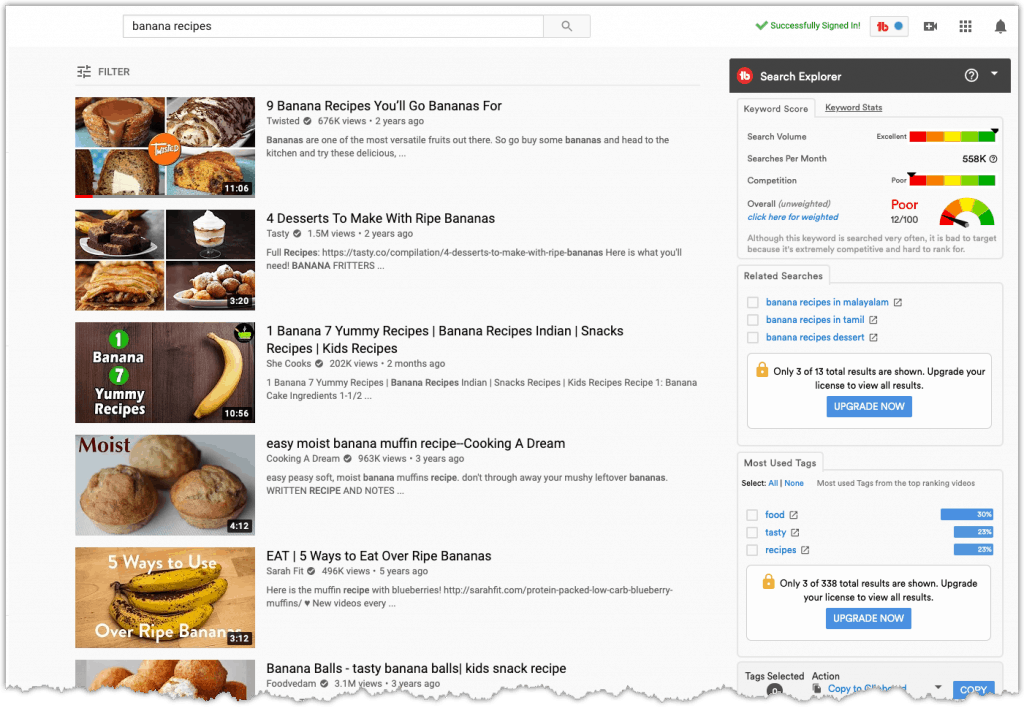
TubeBuddy is a competitor of VidIQ and offers similar features, and uses a chrome extension to display keyword and video information on the page of YouTube’s website.

10 Best Tools to Grow Your YouTube Channel 10

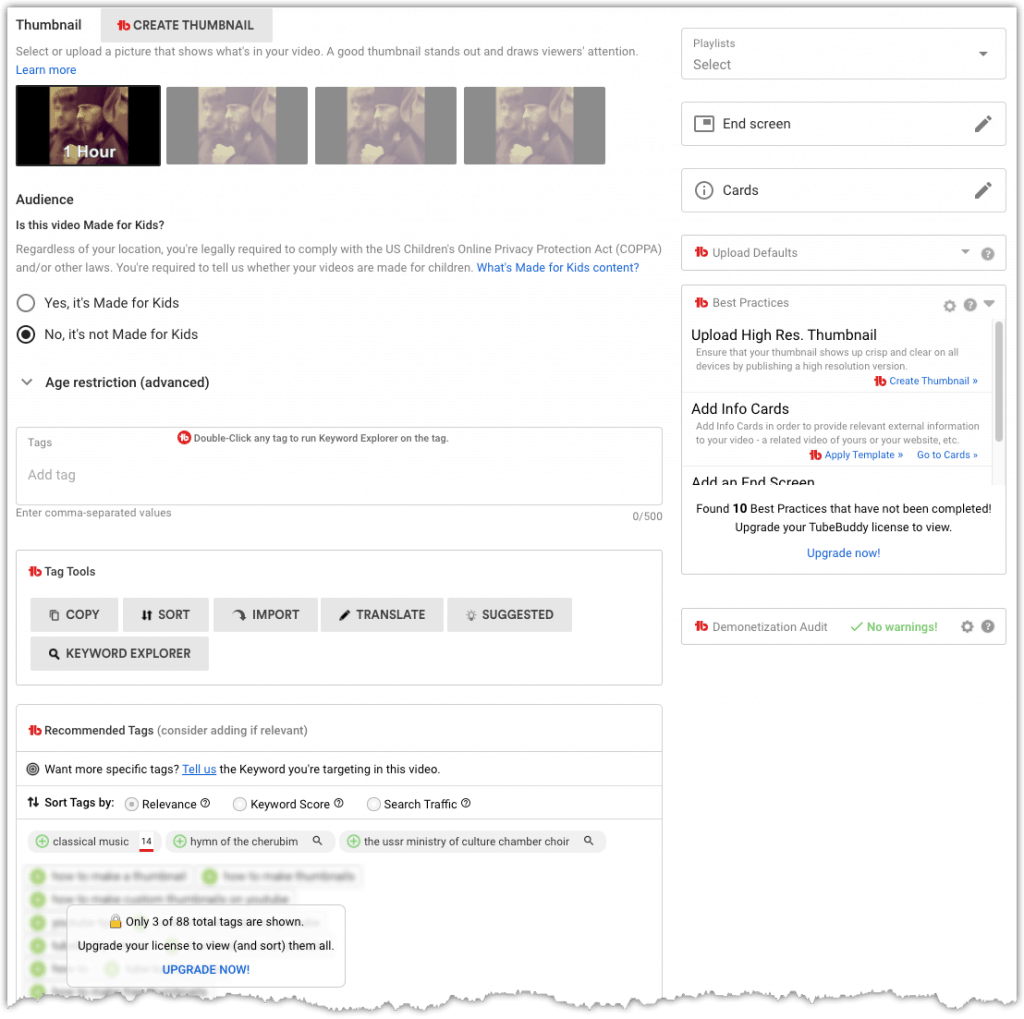
TubeBuddy also offers ideas for tags and other metadata when you upload a video. It advises on best practices to have your video rank as high as possible.  It reminds you to add cards, end screens, and other essential parts that add up to make a successful YouTube video.

10 Best Tools to Grow Your YouTube Channel 11

There is a limited free option to give you an idea of what the software can do, but to get lasting benefits, you need to take out a monthly subscription. Pricing starts at $9 per month for the ‘Pro’ level, though you can save 50% if you have less than 1000 subscribers.

Of course, you will only need to use either TubeBuddy or vidIQ to manage your channel, while they are both excellent, vidIQ has the slight edge.

Website: tubebuddy.com
Price: From $9 ($4.50 if you have less than 1000 subscribers.)

YouTube Autosuggest

Sometimes thinking up new content ideas is hard. But it can be time wasted, too, if you don’t perform keyword research first to see if your ideas are even popular.

Fortunately, there is a free way to check if people have an interest in your idea, and that is on YouTube itself.

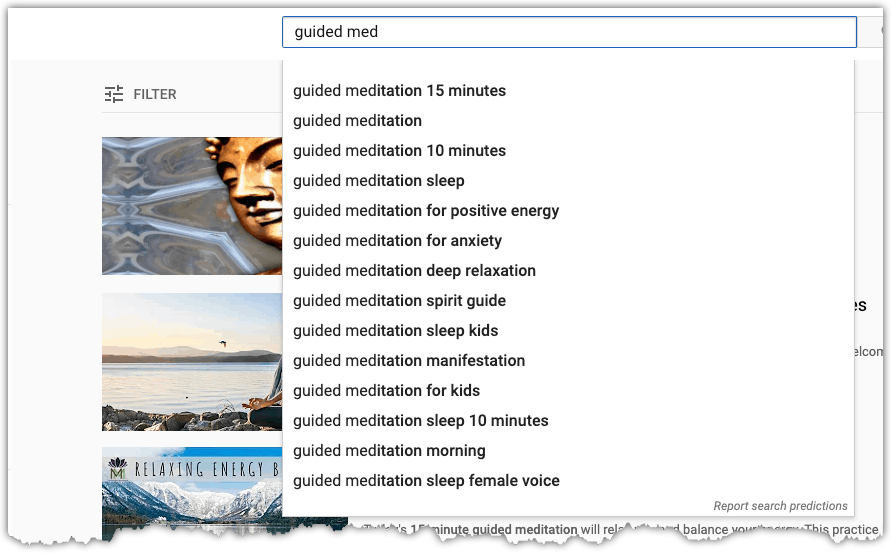
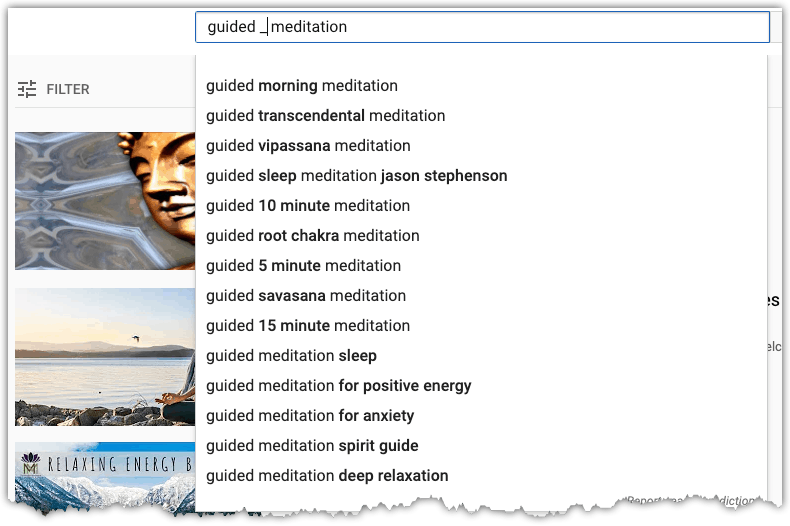
You may have noticed when you begin typing in the YouTube search bar a dropdown box appears with a list of options. These show a list of search terms that users are already using on YouTube to find content.

Use the auto-suggest feature to find and validate your content ideas.

10 Best Tools to Grow Your YouTube Channel 12

When you are compiling ideas from YouTube Autosuggest, also make use of the underscore character ‘_’. It acts as a wildcard when placed between two words. Here is an example.

10 Best Tools to Grow Your YouTube Channel 13

YouTube is giving you content ideas free of charge!  Take this method a step further and combine the autosuggest search terms with the free version of vidIQ. You can see which of the ideas are popular and which you have a chance to rank with.

Website: youtube.com
Price: Free!

Morning Fame

Morning Fame is a website rather than the chrome plugin functionality of vidIQ and TubeBuddy.  Morning Fame provides analytics for uploaded videos and a keyword tool to plan future content.

The analytics section gives a good historical overview of your channel’s performance.  And offers suggestions on which of your videos perform best for your audience, and recommends which type of videos you should try to replicate.

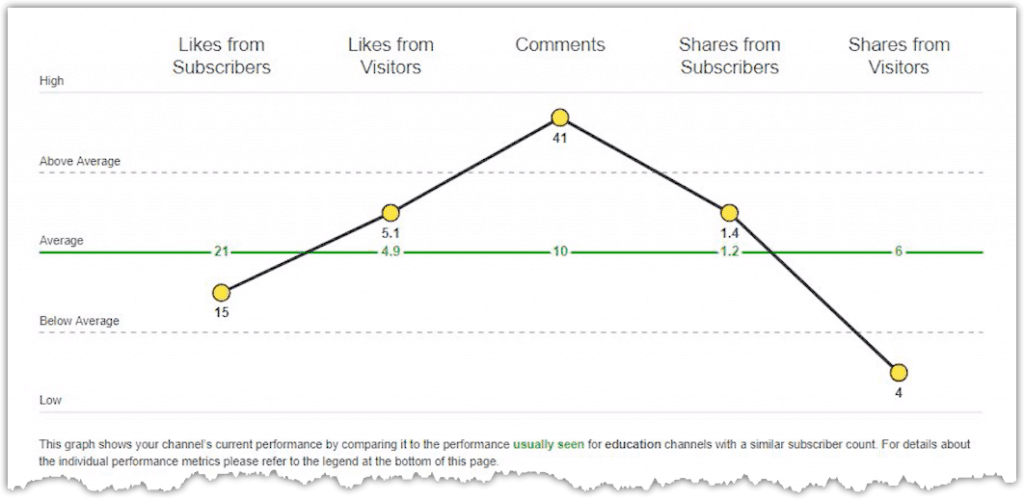
Morning Fame also benchmarks your channel against to similar ones.

10 Best Tools to Grow Your YouTube Channel 14

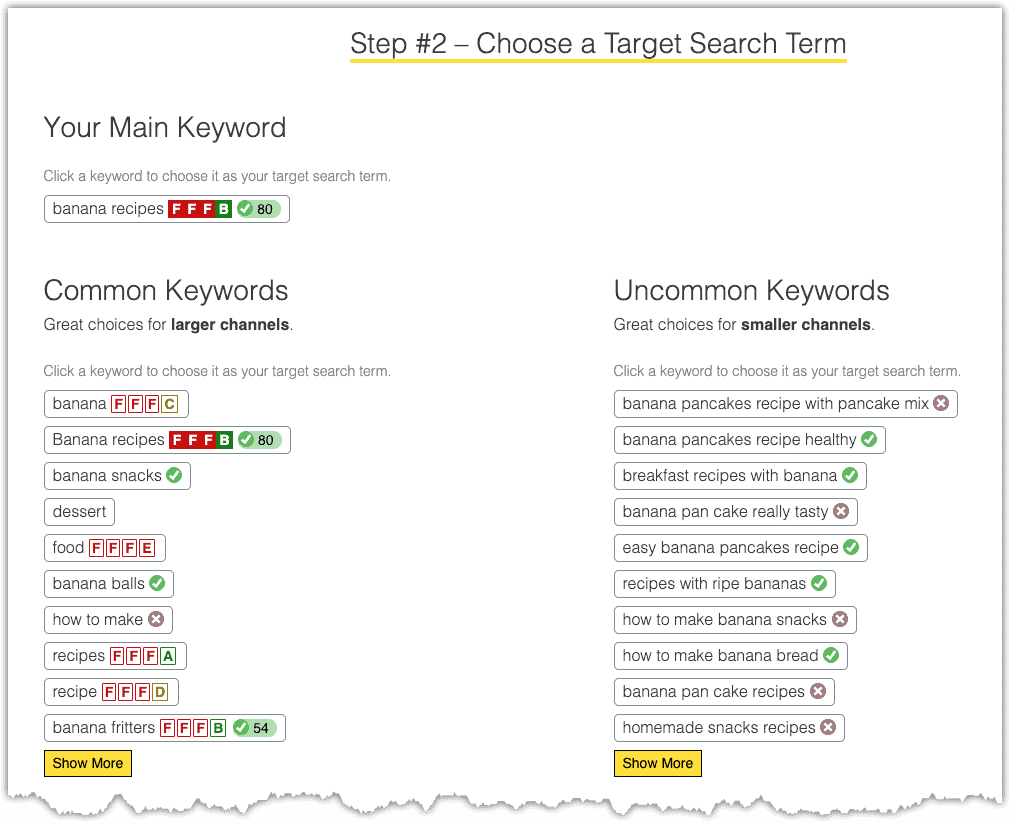
The keyword research tool suggests content ideas, and rates your chance of ranking for them considering your channel size.

10 Best Tools to Grow Your YouTube Channel 15

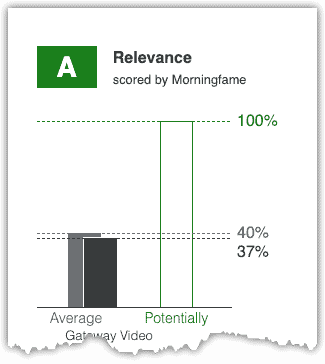
Once you pick a target keyword, Morning Fame rates your channel’s chance of ranking for the keyword.

10 Best Tools to Grow Your YouTube Channel 16

Morning Fame offers two levels of subscription.  While both have full access to analytics reporting, if you want more than occasional access to the keyword research tool, you’ll need to choose the Plus plan at $12.90 per month.

Website: morningfa.me
Price: From $4.90 per month.

Conclusion

You’re unlikely to establish a channel on YouTube without using tools. Some tools help to make your videos compelling, and others help find best keywords to rank. There are 500 hours worth of videos uploaded to YouTube every minute, and you need to work hard to make yours stand out.

You need to add intros/outros to brand your videos, use B-roll and sound clips to enhance your content, and then make sure to edit your content well so that it engages viewers.

Finally, if you don’t take advantage of tools to help you plan and promote content, you will fall behind your competitors who will surely be using them.

If you need more help with equipment, software, artwork and other YouTube things then I have a list of EVERYTHING I use on my resources page.

Top 5 Tools To Get You Started on YouTube

Very quickly before you go here are 5 amazing tools I have used every day to grow my YouTube channel from 0 to 30K subscribers in the last 12 months that I could not live without.

1. VidIQ helps boost my views and get found in search

I almost exclusively switched to VidIQ from a rival in 2020.

Within 12 months I tripled the size of my channel and very quickly learnt the power of thumbnails, click through rate and proper search optimization. Best of all, they are FREE!

2. Adobe Creative Suite helps me craft amazing looking thumbnails and eye-catching videos

I have been making youtube videos on and off since 2013.

When I first started I threw things together in Window Movie Maker, cringed at how it looked but thought “that’s the best I can do so it’ll have to do”.

Big mistake!

I soon realized the move time you put into your editing and the more engaging your thumbnails are the more views you will get and the more people will trust you enough to subscribe.

That is why I took the plunge and invested in my editing and design process with Adobe Creative Suite. They offer a WIDE range of tools to help make amazing videos, simple to use tools for overlays, graphics, one click tools to fix your audio and the very powerful Photoshop graphics program to make eye-catching thumbnails.

Best of all you can get a free trial for 30 days on their website, a discount if you are a student and if you are a regular human being it starts from as little as £9 per month if you want to commit to a plan.

3. Rev.com helps people read my videos

You can’t always listen to a video.

Maybe you’re on a bus, a train or sat in a living room with a 5 year old singing baby shark on loop… for HOURS. Or, you are trying to make as little noise as possible while your new born is FINALLY sleeping.

This is where Rev can help you or your audience consume your content on the go, in silence or in a language not native to the video.

Rev.com can help you translate your videos, transcribe your videos, add subtitles and even convert those subtitles into other languages – all from just $1.50 per minute.

A GREAT way to find an audience and keep them hooked no matter where they are watching your content.

4. PlaceIT can help you STAND OUT on YouTube

I SUCK at making anything flashy or arty.

I have every intention in the world to make something that looks cool but im about as artistic as a dropped ice-cream cone on the web windy day.

That is why I could not live on YouTube without someone like PlaceIT. They offer custom YouTube Banners, Avatars, YouTube Video Intros and YouTube End Screen Templates that are easy to edit with simple click, upload wizard to help you make amazing professional graphics in minutes.

Best of all, some of their templates are FREE! or you can pay a small fee if you want to go for their slightly more premium designs (pst – I always used the free ones).

5. StoryBlocks helps me add amazing video b-roll cutaways

I mainly make tutorials and talking head videos.

And in this modern world this can be a little boring if you don’t see something funky every once in a while.

I try with overlays, jump cuts and being funny but my secret weapon is b-roll overlay content.

I can talk about skydiving, food, money, kids, cats – ANYTHING I WANT – with a quick search on the StoryBlocks website I can find a great looking clip to overlay on my videos, keeping them entertained and watching for longer.

They have a wide library of videos, graphics, images and even a video maker tool and it wont break the bank with plans starting from as little as £8.25 ($9) per month.